1.2.3 构建一个Docker镜像
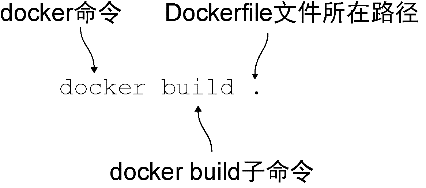
读者已经定义了自己的Dockerfile的构建步骤。现在可以键入图1-7所示的命令,从而构建Docker镜像了。
输出看起来和下面类似。
Sending build context to Docker daemon 2.048kB  ⇽---  Docker会上传docker build指定目录下的文件和目录
Step 1/7 : FROM node  ⇽--- 每个构建步骤从 1 开始按顺序编号,并与命令一起输出
 ---> 2ca756a6578b  ⇽--- 每个命令会导致一个新镜像被创建,其镜像ID在此输出
Step 2/7 : LABEL maintainer ian.miell@gmail.com
 ---> Running in bf73f87c88d6
 ---> 5383857304fc
Removing intermediate container bf73f87c88d6  ⇽--- 为节省空间,在继续前每个中间容器会被移除
Step 3/7 : RUN git clone -q https://github.com/docker-in-practice/todo.git
 ---> Running in 761baf524cc1
 ---> 4350cb1c977c
Removing intermediate container 761baf524cc1
Step 4/7 : WORKDIR todo
 ---> a1b24710f458
Removing intermediate container 0f8cd22fbe83
Step 5/7 : RUN npm install > /dev/null
 ---> Running in 92a8f9ba530a
npm info it worked if it ends with ok  ⇽--- 构建的调试信息在此输出(限于篇幅,本代码清单做了删减)
 [...]
npm info ok
 ---> 6ee4d7bba544
Removing intermediate container 92a8f9ba530a
Step 6/7 : EXPOSE 8000
 ---> Running in 8e33c1ded161
 ---> 3ea44544f13c
Removing intermediate container 8e33c1ded161
Step 7/7 : CMD npm start
 ---> Running in ccc076ee38fe
 ---> 66c76cea05bb
Removing intermediate container ccc076ee38fe
Successfully built 66c76cea05bb  ⇽--- 此次构建的最终镜像ID,可用于打标签
现在,拥有了一个具有镜像ID(前面示例中的“66c76cea05bb”,不过读者的ID会不一样)的Docker镜像。总是引用这个ID会很麻烦,可以为其打标签以方便引用,如图1-8所示。
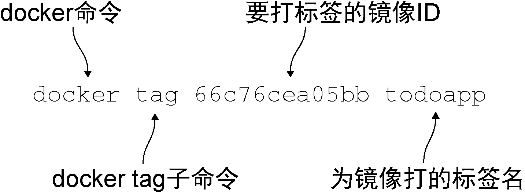
输入图1-8所示的命令,将66c76cea05bb替换成读者生成的镜像ID。
现在就能从一个Dockerfile构建自己的Docker镜像副本,并重现别人定义的环境了!