2.1.3 设计视图
控制器创建完成后,就该开始设计视图了。Spring 为定义视图提供了几个很好的选项,包括 JavaServer Pages(JSP)、Thymeleaf、FreeMarker、Mustache 和基于 Groovy 的模板。现在,我们将使用 Thymeleaf,这是我们在第 1 章开始项目时所做的选择。我们将在 2.5 节中考虑其他一些选项。
为了使用 Thymeleaf,需要在构建项目时添加另一个依赖项。下面的 <dependency> 条目使用了 Spring Boot 的 Thymeleaf starter,使 Thymeleaf 渲染要创建的视图:
<dependency>
    <groupId>org.springframework.boot</groupId>
    <artifactId>spring-boot-starter-thymeleaf</artifactId>
</dependency>
在运行时,Spring Boot 自动配置将看到 Thymeleaf 位于类路径中,并将自动创建支持 Spring MVC 的 Thymeleaf 视图的 bean。
像 Thymeleaf 这样的视图库被设计成与任何特定的 web 框架解耦。因此,他们不知道 Spring 的模型抽象,并且无法处理控制器放置在模型中的数据。但是它们可以处理 servlet 请求属性。因此,在 Spring 将请求提交给视图之前,它将模型数据复制到请求属性中,而 Thymeleaf 和其他视图模板选项可以随时访问这些属性。
Thymeleaf 模板只是 HTML 与一些额外的元素属性,指导模板在渲染请求数据。例如,如果有一个请求属性,它的键是 “message”,你希望它被 Thymeleaf 渲染成一个 HTML <p> 标签,你可以在你的 Thymeleaf 模板中写以下内容:
<p th:text="${message}">placeholder message</p>
当模板被呈现为 HTML 时,<p> 元素的主体将被 servlet 请求属性的值替换,其键值为 “message”。th:text 是一个 Thymeleaf 的命名空间属性,用于需要执行替换的地方。${} 操作符告诉它使用请求属性的值(在本例中为 “message”)。
Thymeleaf 还提供了另一个属性 th:each,它遍历元素集合,为集合中的每个项目呈现一次 HTML。当设计视图列出模型中的玉米饼配料时,这将非常方便。例如,要呈现 “wrap” 配料列表,可以使用以下 HTML 片段:
<h3>Designate your wrap:</h3>
<div th:each="ingredient : ${wrap}">
    <input name="ingredients" type="checkbox" th:value="${ingredient.id}" />
    <span th:text="${ingredient.name}">INGREDIENT</span><br/>
</div>
在这里,我们在 <div> 标签中填充 th:each 属性,用来对发现于 wrap 请求属性中的集合中的每一个项目进行重复呈现。在每次迭代中,成分项都绑定到一个名为 ingredient 的 Thymeleaf 变量中。
在 <div> 元素内部,有一个复选框 <input> 元素和一个 <span> 元素,用于为复选框提供标签。复选框使用 Thymeleaf 的 th:value 元素,它将把 <iuput> 元素的 value 属性呈现为在成分 id 属性中找到的值。<span> 元素使用 th:text 属性把 "INGREDIENT" 占位符替换为成分 name 属性的值。
当使用实际的模型数据呈现时,这个 <div> 循环迭代一次可能是这样的:
<div>
    <input name="ingredients" type="checkbox" value="FLTO" />
    <span>Flour Tortilla</span><br/>
</div>
最后,前面的 Thymeleaf 片段只是一个更大的 HTML 表单的一部分,通过它,玉米饼艺术家用户将提交他们美味的作品。完整的 Thymeleaf 模板(包括所有成分类型和表单)如下所示。
<!DOCTYPE html>
<html xmlns="http://www.w3.org/1999/xhtml"
      xmlns:th="http://www.thymeleaf.org">
    <head>
        <title>Taco Cloud</title>
        <link rel="stylesheet" th:href="@{/styles.css}" />
    </head>

    <body>
        <h1>Design your taco!</h1>
        <img th:src="@{/images/TacoCloud.png}"/>
        <form method="POST" th:object="${design}">
            <div class="grid">
                <div class="ingredient-group" id="wraps">
                    <h3>Designate your wrap:</h3>
                    <div th:each="ingredient : ${wrap}">
                        <input name="ingredients" type="checkbox" th:value="${ingredient.id}"/>
                        <span th:text="${ingredient.name}">INGREDIENT</span><br/>
                    </div>
                </div>
                <div class="ingredient-group" id="proteins">
                    <h3>Pick your protein:</h3>
                    <div th:each="ingredient : ${protein}">
                        <input name="ingredients" type="checkbox" th:value="${ingredient.id}" />
                        <span th:text="${ingredient.name}">INGREDIENT</span><br/>
                    </div>
                </div>
                <div class="ingredient-group" id="cheeses">
                    <h3>Choose your cheese:</h3>
                    <div th:each="ingredient : ${cheese}">
                        <input name="ingredients" type="checkbox" th:value="${ingredient.id}"/>
                        <span th:text="${ingredient.name}">INGREDIENT</span><br/>
                    </div>
                </div>
                <div class="ingredient-group" id="veggies">
                    <h3>Determine your veggies:</h3>
                    <div th:each="ingredient : ${veggies}">
                        <input name="ingredients" type="checkbox" th:value="${ingredient.id}"/>
                        <span th:text="${ingredient.name}">INGREDIENT</span><br/>
                    </div>
                </div>
                <div class="ingredient-group" id="sauces">
                    <h3>Select your sauce:</h3>
                    <div th:each="ingredient : ${sauce}">
                        <input name="ingredients" type="checkbox" th:value="${ingredient.id}"/>
                        <span th:text="${ingredient.name}">INGREDIENT</span><br/>
                    </div>
                </div>
            </div>
            <div>
                <h3>Name your taco creation:</h3>
                <input type="text" th:field="*{name}"/><br/>
                <button>Submit your taco</button>
            </div>
        </form>
    </body>
</html>
可以看到,对于每种类型的配料,都要重复 <div> 片段。还包括一个提交按钮和一个字段,用户可以在其中命名他们的创建。
值得注意的是,完整的模板包括 Taco Cloud 图标图片和一个指向样式表的 <link> 引用。在这两种情况下,Thymeleaf 的 @{} 操作符被用来产生一个上下文相关路径的静态工件,它们正在引用。正如在第 1 章中了解到的,Spring 启动应用程序中的静态内容是从类路径根目录的 /static 目录提供的。
现在控制器和视图已经完成,可以启动应用程序了。运行 Spring Boot 应用程序有许多方法。在第 1 章中,展示了如何运行这个应用程序,首先将它构建到一个可执行的 JAR 文件中,然后使用 java -jar 运行这个 JAR。展示了如何使用 mvn spring-boot:run 从构建中直接运行应用程序。
无论如何启动 Taco Cloud 应用程序,一旦启动,使用浏览器访问 http://localhost:8080/design。应该看到类似图 2.2 的页面。
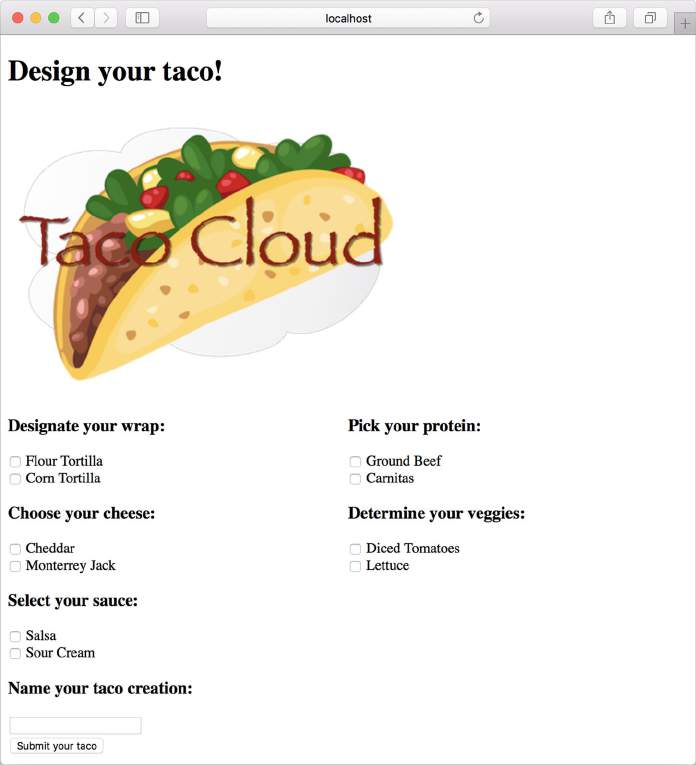
它看起来真不错!访问这个玉米饼艺术家呈现形式的网站,包含一个调色板的玉米饼成分,从中他们可以创建自己的杰作。但是当他们点击 Submit Your Taco 按钮时会发生什么呢?
DesignTacoController 还没有准备好接受玉米饼创作的请求。如果提交了设计表单,用户将看到一个错误。(具体来说,它将是一个 HTTP 405 错误:请求方法 “POST” 不受支持。)让我们通过编写更多处理表单提交的控制器代码来解决这个问题。